About Me

My photo
We provide therapy to children with autism, focusing on Pivotal Response Treatment and Physiotherapy. We are also parents to a child with autism.

Wednesday, August 31, 2016

Should you tell others your child has autism


Here are some things to consider when you are deciding whether or not to tell others

1) Does your child know they have autism
Whether your child should be aware of having autism is another discussion. However, if they are unaware themselves, you may not want to tell others

2) Where is your child on the spectrum and what are their communication deficits
If your child is on the milder side of the spectrum, telling others may result in generalizations. People might treat your child differently in a way that is not necessary. Conversely, if your child does or says something that others perceive to be weird they may not want to continue the interaction. Telling them about the diagnosis can lead to understanding and they may be more willing to continue the interaction.

3) Do you expect to see people one time or on an on-going basis
If you are seeing someone for a short, single episode; disclosing a diagnosis may not be necessary. However, if the interaction is on-going (i.e. at school or after school activity) a disclosure is likely beneficial. It allows others to know what to expect and discuss strategies.

4) Should you raise autism awareness
Your own feelings and opinions are most important. However, telling others about autism is always a worthy cause. This helps others to create understanding. Prior to having a son with a diagnosis my knowledge of what autism was, is drastically different than what it is now. Now I understand the saying "If you've met one person with autism, you've met one person with autism".

As for us, we are pretty open about our son's diagnosis. We have found that telling others helps to foster understanding and the other kids are more willing to maintain interactions. We will also be telling our son's class in the form of a presentation to the kids (more in that in the future). Telling other parents and adults will usually lead to some great discussions and even foster friendship and communication among adults. Our primary reason for disclosure is to help our son with social interactions and not autism awareness. However we are happy to help with that as well.

Tuesday, August 30, 2016

Activity #40: Paper mache pig


Description: This is a two part activity
Part 1: We made the paper mache structure. In this case we made a pig. We put a pudding cup on a balloon for the snout, and parts of an egg carton for legs and ears. We dipped newspaper strips into the flour water mixture and covered the pig
Part 2: After the paper mache pig dried, we painted it with washable paints
Age: 3+
Purpose:
Sensory
Fine motor
Creativity
Prep time: extensive. You have to make the newspaper strips, the mixture. This is also a messy activity that requires a lot of clean up and adult supervision
What you’ll need: Flour and water to make the mixture, for the pig we used a balloon, egg carton and pudding cup, and you’ll need paint.
Fun Factor: The first part of this activity was a challenge. My younger son would not touch the flour mixture. My older spectrum son dipped a few newspaper strips and put them on the pig. After that he had enough. There was a lot of monitoring the kids to keep the mess contained. I ended putting on most of the strips. They enjoyed painting the pig better. They liked changing up the colours and we finished painting the pig together.

Monday, August 29, 2016

Succeeding at School: Prepare a reinforcement package


In order to give my son to have the best chance to succeed at school I created a reinforcement binder for the teacher. My son often does not like to do hard work. But, if there is an incentive at the end (a favourite activity), he usually will complete the work. The reinforcement binder has some favourite activities: mazes, streets signs, and maps. The idea is the teacher can say “when you are finished this activity, you may choose something from your binder”. He will then get to look through the binder and pick what he would like to do. It works out nicely, that our most of our son’s favourite activities are marker and paper activities. However, you can provide a box of quiet toys, favourite books or magazines to look at. An added bonus, is that the other children may become interested and lead to socialization opportunities.

Today, was our school visit before the first day as part of our transition plan. We presented the binder to the teaching staff. We also let our son have a look through it and pick out a reinforcer. He finished a few of the activities while he was at the school. He now has developed some excitement about going to school. We’ll keep you posted as to how the binder is working out during the first week.

Sunday, August 28, 2016

Products we love: High Five Magazine (Highlights)


This is the Kindergarten version of Highlight Magazine. I used to receive a Highlights Magazine every month when I was a child. I looked forward to getting one every month. The kindergarten version is full of short stories and activities including: hidden objects, what’s the same/different and that’s silly. It also has recipes and craft ideas.

The kids enjoy listening to the stories and doing the activities. Their favourite is the “That’s Silly” page, were you look for all the silly things in the scene. I like it because it introduces new reading material into the house. My son is a good reader, but we have read all of our household books multiple times. With a few new stories every month, we can ensure he is comprehending the stories. Sometimes I will even make activities based on the stories to practice comprehension. For example, one story was about buying things at a grocery store. I made little piece of paper with the names of foods at the grocery store. I had the boys pick out the items they bought in the story.

Checkout the Highlights website for more information

Thursday, August 25, 2016

Activity #39: Alphabet scavenger hunt


Description: The children had to find objects around the house that started with each letter of the alphabet. I wrote all the letters of the alphabet on a piece of paper. When the kids found an object they put it with the matching letter. For my son that loves road signs, he had to find come up with a street name that started with each letter. If he couldn’t think of one, he had to look it up in a map book.
Age: 3+ or when they know their alphabet
Purpose:
Alphabet
Matching
Phonics
Search and find
Prep time: minimal
What you’ll need: a piece of paper and marker
Fun Factor: My 3 year old sustained his attention until about “M” and then he lost interest. He enjoyed finding animals and objects to match the letters. My older son finished writing streets signs for each letter. It was somewhat difficult for him to think of a sign for each letter, but street signs are very motivating for him. At the time, I thought he didn’t enjoy it that much. However, a week later he asked to do it again.

Wednesday, August 24, 2016

Tips on dealing with tantrums

Unfortunately, tantrums happen from time to time. Even if you have done everything ahead of time to try to prevent them from happening. Here is what to do if you find yourself in the middle of a tantrum.


Stay calm and neutral
When your child is having a tantrum, it is important to keep calm yourself. First, make sure everyone is safe. In a calm, neutral voice you can state “You are feeling sad”. After this, sit near your child (but not touching them), keep your body still. Try to be silent or say very little, until your child is calm. Children are not able to taken in verbal information when they are upset.

Do not reinforce the tantrum
As a parent our first instinct is to do whatever we can to make the tantrum stop. But it is important that this behaviour is not rewarded. Some things we do can be rewarding to a child, even if you wouldn’t think so. For example, yelling at the child can be reinforcing because they know that they angered you. That is why it is important to stay calm and neutral.

“When your calm we can talk”
For older kids with good comprehension you can say “When you’re calm we can talk”. When I say this my son will immediately stop crying and say “I’m calm, “I’m calm”. Even though he stops crying I know he still needs some time (He is still breathing heavy and fidgety). I might follow this by saying “I will know you are calm when your arms and legs are still and you are breathing normally”.

Quietly start another activity
For younger less verbal children you can start quietly playing with another activity that your child may find interesting. Do not actively draw attention to the actively (ie Don’t say “Come over here an play”). The idea is to for your child to decide they want to stop crying and come over without reinforcing the crying.

Talk it out
Once your child is completely calm you can talk about what happened. Usually, my son’s threshold for another tantrum is much lower. Depending on the situation you may decide to prompt your child to say the appropriate response and then reinforce it (“Can I have a cookie” and give them a cookie”). However, if the tantrum is occurring regularly you may say “Next time you’ll remember to ask nicely”.

Try to figure out why it happened
Think about the incident and try to figure out why the tantrum occurred. Write down what happened before the tantrum. Write down what happened afterwards. Also keep note of the time of day, the environment, when did they last eat, is there a sensory component. Your strategy to prevent one next time will depend on this. For example, occasionally my son will have a tantrum that is completely unexpected. The exact same scenario on a different day would not lead to a tantrum. We started to realize that when he was hungry his threshold for having a tantrum was a lot lower. So, part of the solution was to keep him well fed.

Tuesday, August 23, 2016

Activity #38: Thomas the train ramp race


Description: My younger son is a big fan of Thomas and friends. My older ASD son likes trains ok, but its not his top choice. I created this activity in the hopes that they would work together. We used one of our ramps and sent each train down one at a time. Then we marked it on the floor with painter’s tape. The purpose was to see which train would go the farthest.
Age: 3+
Purpose:
Measurement
Cheering for each other
Writing
Fine motor (tearing tape)
Prep time: minimal
What you’ll need: a ramp and trains. If you don’t have trains you can use cars or anything that rolls
Fun Factor: It took a few trains to get things going, but after that we marked down every single train that we had. This was really engaging for my ASD child, my Thomas the train lover son preferred to do pretend play. They wanted to do again a few days later, so I would say it was successful.

Monday, August 22, 2016

Getting your child to do household chores


One of my earlier blog posts was about the importance of getting your child to help out around the house. Turns out this is easier said than done. While I would get enthusiastic helpers once and a while, most of the time, I got a big “No”. I have read a lot of parent articles about whether or not to pay your child to help out around the house. At first, I was leaning to the side of not paying kids. But, it is very motivating to earn money to buy a new toy. So, we set a goal with a dollar amount, and gave the kids a dollar every time they helped out with something around the house. We wrote the dollar amount on a white board (because we didn’t have any loonies available), but giving them an actual dollar may be more tangible. After, they earned the goal, we went to the store to buy the item. An example of how motivating this can be: My son is afraid of washing machines, because the spin cycle is too loud. He agreed to come downstairs and transfer the wet laundry into the dryer. That was a pretty big win.

Sunday, August 21, 2016

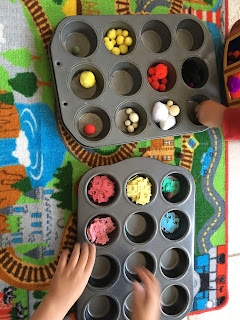
Activity #37: Sorting


Description: Have your children sort various objects into muffin tins. Objects that we have sorted include bread tags and puffs. You can have them sort but colour (easiest), but also by size or shape etc. You can also weave other learning opportunities within this activity such as counting (How many green puffs are there?).
Age: 3+
Purpose:
Colours/shapes/size (other descriptors)
Counting (How many green puffs are there?)
Sequencing (Can you give me five white bread tags?)
Skip counting (How many purple bread tags are there?, arrange into rows of 5 and skip count)
More and less (which pile has more?)
Prep time: minimal
What you’ll need: muffin tin (or containers), and objects to sort (bread tags, craft puffs, buttons etc)
Fun Factor: I have done this activity on multiple occasions with my children. They enjoy playing with objects and sorting them by colour. Every so often I will ask them a questions while their doing it, so they don’t even know they are being quizzed. If you have a lot of things to sort, you can do this multiple times.

Wednesday, August 17, 2016

Activity #36: Highway onramp and off ramp craft


Description: This activity was my sons idea (with me taking it to the next level). He wanted to draw highway on-ramps and off-ramps, but you really need to make it 3D. We used cardboard and and construction paper to make an overpass and then added on-ramps and off-ramps.
Age: 5+
Purpose:
Scissor skills
Using tape
Creativity
Learning about structure
Prep time: This is a pretty parent intensive activity as cutting construction usually requires a knife. The kids will also require help to make it stable.
What you’ll need: cardboard, construction paper, tape
Fun Factor: My son was initially resistant and drew on paper while I started making the overpass. Once, he realized what I was doing he got really into making the off-ramps and on-ramps. He cut out the shapes of the ramps with construction paper and I cut out the cardboard to support it. It actually turned out pretty strong and we could actually drive the cars on the ramps. This activity kept us going for about an hour.

Tuesday, August 16, 2016

Activities we love: Camping


Why we like it: Camping can be a challenging experience for a child with autism. My child has a fear of automatic toilets, and flying insects. He also doesn’t particularly like grass or dirt on his feet. However, we feel camping is a great experience to expose him (gently) to his fears, meet new people and develop coping skills in the real word.

Preparation is key:
1) Choose a camp site where there are a lot of kid friendly activities: We like places with large pools, water slides, playgrounds and recreational activities. A restaurant on site is also great if the camp food doesn’t go over well
2) Have a plan to help them manage their fears: we brought a large blanket so he had a space free of grass. We bought a tent with enclosed netting to help manage the bug fear. We brought urinals and a portable toilet to manage his fear of automatic toilets (which limits us going to the washroom at rest stops).
3) Bring favourite foods and snacks: Meltdowns often occur more easily when the kids are hungry. It is important to make sure you have well liked snacks that are easy to grab when you’re in the car, setting up equipment and cooking.
4) Prime your child on what to expect: Discuss before hand a general game plan, the drive, rest stops, setting up equipment, activities available and downtime. Avoid having a rigid schedule as flexibility is required.
5) Bring some favourite activities: allow them to have some time to spend with their repetitive interest to help regulate their emotions
6) Bring just in case items: prepare for rain, cold weather etc, to avoid negative experiences.

We have camped twice this summer, and we a third trip planned. We have learned from each experience and improved our preparation for each trip. Both of our boys enjoyed the experience, and aside from screaming at a few bugs there were no major meltdowns. We were able to meet some other kids and practice our conversation and play skills. The boys are looking forward to our next trip.

Monday, August 15, 2016

Activity #9: Pillow sandwiches (Repost)

When I first did this post, I said that I would sew some sandwich toppings to make the activity even more fun. I promised that I would post a picture when it was done. So, as per promised.


I used different textures and lentils to create different weights and sensory experiences. I made swiss cheese, cheddar cheese, bean bag ketchup and mustard, lettuce (also with beans to make it heavy), tomato with beads to add a texture, and cucumber.

Description: Use couch cushions, throw cushions and blankets to make a giant sandwich with your child as the meat. Get your child to lie down on the “bread”, and asked them what meat they want to be and what toppings they would like to have on it. Then put the top slice of bread on and grill the sandwich by pushing down on the pillows. They will also enjoy putting toppings on the parents.
Age: 2 and up
Purpose:
Proprioception
Pretend play
Turn taking
Labelling
Prep time: minimal to moderate
What you’ll need: Couch cushions and various colours of thrown pillows and blankets
Fun Factor: This was a big hit. The kids like to be squished in between all the pillows and climb on top to grill. It was such a big hit, I will be putting my sewing skills to the test to try to make some more realistic toppings. I have also done this activity with some other kids, and they found it equally fun.
Safety tip: Make sure the child who is being squished has their face visible at all times. Also, the sandwich can get pretty high, so make sure you watch the child doing the “grilling” closely.

Sunday, August 14, 2016

Tips on improving scissor skills

Here are some tips on getting your child to improve their cutting skills.


Teach thumbs up, and “helper hand” Have them give a thumbs up before grabbing the scissors. Teach them that their non-dominant hands is the “helper hand” and has a job of its own.


Use thick paper Thicker paper is easier to cut than thinner paper. This is because it stays stiff and doesn’t flop over when they are cutting. Try using card stock (construction paper isn’t thick enough).


Use 1/4 sheets paper Normal sheets of paper (8.5x11) are hard to cut because they flop over when the child is cutting and are harder to manipulate. If you cut the paper into quarters, it is easier for the child to cut.


Cut PlayDoh to build strength Have your child roll the dough in to worms and cut them with PlayDoh scissors. This can build strength in the muscles required for cutting. PlayDoh is fun and a great way to develop fine motor skills. Playing with tongs and tweezers can also develop strength.

Cut between two lines Have your child cut between two straight lines that are about 1cm apart (or one thick solid line). Gradually decrease the distance between the lines and add curves and simple shapes


Cut out motivating shapes Our son loves street signs. His scissors skills really improved once he started drawing and cutting out street signs. These signs were posted all over the house. We also took pictures of highways exits and cut them out and made a map. This was another motivating activity that got a lot of scissor practice. Pick your child’s favourite foods, TV characters, toys etc. to help get them excited about doing the activity.


For more information and resources check out Canchild.ca (Scroll down to resources for JK/SK)

Thursday, August 11, 2016

Parenting Tip# 4: Use positive statements


There are many things we say during the day that are negative, that can be rephrased in a positive manner. It does take a little bit of thought, and at first you might reflect on something you said and think “I could have rephrased that to be positive”

Here are some examples:

Instead of: “you can’t play with your cars until you clean up your puzzle”, try saying. “After you clean up your puzzle, you can play with your cars”

Instead of: “you can’t have a cookie”, try saying “you can have a cookie after lunch”

Instead of firmly saying: “Clean up your toys!”, trying saying “time to clean up your toys please” with a neutral tone of voice.

Wednesday, August 10, 2016

Activity #34: Traffic light craft


Description: We used an old cardboard box to cut out a rectangle in the shape of a traffic light. I drew circles on red, yellow and green construction paper. I had the kids cut out the circles and glue them onto the cardboard to make a traffic light. The next step is optional: you can use small rectangles of the cardboard, and spread out one end like a fan and glue it over the circle. This makes the traffic light look more realistic.
Age: 3+ (you can modify how much the kids do depending on their age)
Purpose:
Tracing
Cutting
Pasting
Creativity
Prep time: moderate, more prep would be required for younger kids, or for those with less fine motor skills
What you’ll need: cardboard, construction paper, scissors, glue stick
Fun Factor: This is a motivating activity for a child that loves street signs and anything related to traffic. Just make sure you adapt it to their skills, so they don’t think the activity is too hard. You can see from the picture that we added a left turn signal.

Tuesday, August 9, 2016

Products we love: Wikki Stix


Our son has had hours of fun playing with his Wikki Stix. They are made from a non-toxic, food-grade wax and hand-knitting yarn. The sticks help with tactile sensory stimulation & fine motor skills. They are soft, pliable and stick to any smooth surface. You can twist them into various shapes, stick them to surfaces. He has enjoyed forming the alphabet, making glasses, as well as pictures of his family.

Look under Special needs www.wikkistix.com and it will give you an explanation of how Wikki Stix help children and adults with special needs. It also has more specific information under the title A Multi-Sensory Resource for Autism.

Explore the site for more ideas, how to videos and information.

Monday, August 8, 2016

Activity #33: My favourite things story book


Description: This activity was created to get my son to practice his writing, drawing and being able to talk about himself. Talking about your favourite things is a motivating thing to talk about. I wrote the first few examples and had him fill in the blanks. Eg. My favourite dessert is _. After, a few examples, I had him pick the topic and the answer. Eg. My favourite _ is _.
Age: 3+, with younger kids you will write in the answers for them
Purpose:
Writing
Drawing
Question asking
Talking about oneself
Prep time: minimal
What you’ll need: a few pieces of paper folded into a book and some markers
Fun Factor: My son maintained his interest when I choose the topics (and he filled in the answers), but struggled at bit when he had to come up with his own. I kept the favourite things topics motivating (favourite car, waterslide, dessert, food etc), to keep the interest high.

Sunday, August 7, 2016

Autism Resource #5: The Incredible 5-Point Scale


This is a book written by Kari Dunn Burton which we found help to manage inappropriate behaviours when our son was asking for something. He often asked for something with a whine and sometimes with kicking, screaming and stomping. I developed a scale to teach him how to ask nicely for something and so he could understand the consequences. The scale can be used for many things, including voice volume, to describe how you are feeling and many others. ASD kids can have trouble with communication which is even harder when they are emotional. I’m at a “5” rather than having to describe “i’m an feeling angry and I might hit or kick or yell and I need help”. The book give many examples of scales that have already been developed. You can also adapt the scale to fit your individual child.

This is an example of a voice volume scale


This is the example we created for requesting items


For more information, examples, and some word documents to create your own visit http://www.5pointscale.com

Thursday, August 4, 2016

Activity #32: Water relay


Description: This was based on a survivor challenge: the contestants had to keep filling up a bucket (with a hole) with water until it was full enough to drop to the ground. I had two lids with holes in hit and the kids had to block the hole with their finger and fill up another container with water. With changed up the activity to use various size of containers to fill, counting how many containers it would take to fill etc. They can request what shape, size or colour of container they want to use to create language opportunities
Age: 3+
Purpose:
Problem solving (to figure out to block the hole)
Cooperative play
Counting
Measuring
Shapes
Colours
Sizes
Prep time: moderate, to set up a course
What you’ll need: a large container to hold the water, a medium size for the kids to fill and various small containers of different shapes, sizes, colours, with and without holes. A lot of towels on the floor (if you choose to do this inside)
Fun Factor: This was one activity that was motivating to both boys. My three year old played for about 45 minutes with all the variations of the activity. The container with the a hole was a little frustrating for them, but it was smooth sailing once we added different containers.
Safety tip: if you plan to do this activity inside make sure you have a lot of towels on the floor to catch the spilt water (for easy clean up) and so the children don’t slip.

Wednesday, August 3, 2016

Products we love: Chewies


Kids with autism frequently will put things in their mouth. This can be a self-stimulatory behaviour. However, oral stimulation can also be a self-regulation strategy (to calm oneself down). Many neurotypical adults and children will also use this strategy in a more appropriate way (biting on nails, chewing on hair). Chewies come in various forms. We like the ones that go on the end of a pencil, because they are socially acceptable. You can also get necklaces, bracelets and toys just for chewing. When we find our son is chewing on things he is not supposed to, we remind him to go and get a chewy. Chewing also stimulates the large muscles of the jaw. Occupational therapists call this "heavy work" and it can help with attention.

See the Scholar’s Choice website for where to buy them

Tuesday, August 2, 2016

Activity #31: Spray bottle shapes


Description: Use painter’s tape to make various shapes on a wall or pavement. Fill a spray bottle with water and have your children spray water on the shapes
Age: 3+
Purpose:
Shape recognition
Fine motor
Prep time: moderate, to make the shapes
What you’ll need: some painter’s tape and spray bottles
Fun Factor: Water play and playing with spray bottles is always a fun activity. The kids enjoyed using the spray bottle to fill in the shapes (and each other). They also enjoyed taking off the lids, and filling the bottles.
Tip: Make sure what ever surface you use will change colour when you spray it with water. We did this on a painted deck and you couldn’t really see the different between wet and dry. Pavement, or a sidewalk would be a better choice.

Monday, August 1, 2016

Tips for helping your child to learn to write

My son had a difficult time learning to write with a pencil. These are some of the things to help him develop his penmanship.

Tracing patterns

First, we had him trace between two lines in various patterns: straight lines, zig zags, waves, etc. Then we gave him enlarged letters to trace with his finger.

Use a triangular rubber holder

He had trouble holding the pencil. He had trouble remembering how to hold his fingers and had trouble pushing hard enough to make a mark on the paper. We used a triangle rubber holder on his pencil, designed to keep the fingers and thumb in the correct position.

Teach cursive writing

Printing letters requires that the pencil be lifted off the paper and put back down to start the next letter, which can be difficult. We used a cursive letter app for an iPad Cursive Writing Wizard by L'Escapadou and Cursive Writing by Horizon Business for our son to practice. He was very happy to trace the letters with his finger. We found that the cursive letters where easier for him to trace and he was very happy spending his time practising. After a short time we purchased a Stylus (a writing instrument for an iPad) for him to use and he learned to write his cursive letters very quickly. We found that once he learned to write in cursive the printing became easy for him.

Practice writing motivating words

Our son loves road signs. We had him practice his printing by writing road signs. As he loves to make road signs, which require printed letters, he now prints all the time using his markers. You can use any words that your child finds motivating (favourite TV characters, toys etc).

Offer choice
Writing with a choice of a colourful marker or pencil crayon can also give them the motivation to start printing

Check out the CanChild.ca website
Here is a link to a great resource for teaching your child how to form letters
See the printing handout under school resources